Remmina is an open-source and widely used remote desktop client for Linux, particularly popular among Ubuntu users. It supports multiple remote desktop protocols, including RDP (Remote Desktop Protocol), VNC (Virtual Network Computing), and SSH. With Remmina, you can easily access your devices or servers remotely from anywhere, ensuring convenience and flexibility.
In this article, we’ll explain how to setup a remote desktop using Remmina on Ubuntu, as well as its configuration and usage.
How To Setup Remote Desktop Using Remmina on Ubuntu
Luckily, Remmina comes preinstalled on Ubuntu. However, if you require to install it for any reason, you can follow one of these two straightforward methods to install Remmina on Ubuntu:
- Using GUI
- Using Terminal
1. Install Remmina Using GUI
First, open the Ubuntu Software from the Activities menu. Then, search for Remmina and click on the Remmina application:

Next, click on the Install button to start the installation of Remmina:

This action will prompt you to enter the password. Here, input your password and click on the Authenticate button. Now, wait until the installation is complete. After the installation, you can enjoy Remmina.
2. Install Remmina Using Command Line
This is the alternative way to install the Remmina on Ubuntu. Firstly, open the terminal and execute the apt update and upgrade command to amend the system repository packages:
$ sudo apt update && sudo apt upgradeNext, add the Remmina PPA repository to install the latest version of Remmina using the following command:
$ sudo add-apt-repository ppa:remmina-ppa-team/remmina-nextAfterward, execute the apt update command to refresh the package List. Then, run the apt install command to install the Remmina:
$ sudo apt update
$ sudo apt install remmina
Finally, you’ve successfully installed the Remmina on your Ubuntu. After installing Remmina on your Ubuntu, you can access and manage remote machines seamlessly. As mentioned earlier, Remmina supports various protocols like RDP, VNC, and SSH, allowing you to connect to different operating systems, including Windows and other Linux distributions.
Accessing Windows Remotely via Remmina on Ubuntu
To access Windows from Ubuntu, first, navigate to Windows Settings, then select the System option:

Next, scroll down, select the Remote Desktop option, and toggle on the Enable Remote Desktop button:

Now, the most important step is to find the IP address and username of the Windows machine. To do so, simply open the Command Prompt and run the following commands:
# To check the IP address of the system
C:>ipconfig
# To check the Username of the system
C:>whoami
Once you’ve completed all the steps, open the Ubuntu machine to remotely access Windows from Ubuntu.
Next, launch Remmina by clicking on the Show Applications icon located at the bottom left of your screen. Then, type Remmina in the search bar and open it:

Next, click on the plus(+) icon to create a new remote connection:

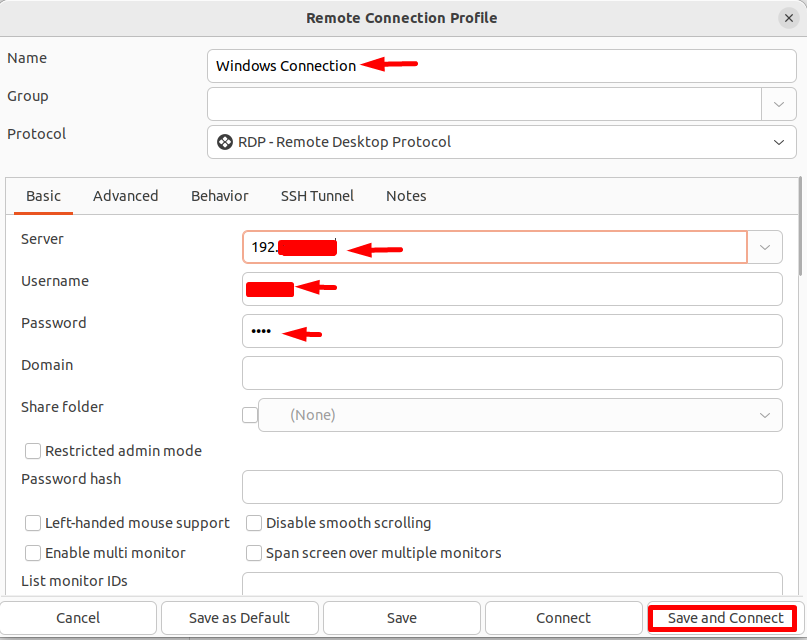
It’ll open a new window, here, you can enter the Name of your remote server. Next, select RDP from the drop-down menu. Then, enter the IP address of the Windows system (remote machine) you want to access remotely in the Server field, along with the Username and Password in their designated fields. Finally, click the Save and Connect button:
Eventually, here is your Windows screen:

Hooray! You’ve successfully accessed the Windows remotely from Ubuntu using Remmina.
Accessing Linux Mint Remotely via Remmina
Here are the below-mentioned steps to remotely access another via Remmina on Ubuntu. For demonstration purposes, we’re using Linux Mint:
First, click the Menu icon located at the bottom left of the screen, then search for Firewall Configuration and select it:

This will prompt you to enter the Linux Mint machine password for authentication. Simply provide it and press the Authenticate button:

Next, select the Allow option for both incoming and outgoing traffic:

Afterward, open the terminal and check the machine’s IP address for later use by running the following ip address command:
$ ip addressNext, launch the x11VNC server, which is pre-installed in Linux Mint. VNC allows users to share and control the desktop remotely:

Now your system is ready to be accessed remotely from Ubuntu.
Let’s navigate to Remmina on your Ubuntu machine and click the add icon located at the top left corner of your screen to create a new remote connection to Linux Mint:

This will open a new window. Where you can enter the Name of your server. Next, select the Remmina VNC Plugin from the drop-down menu. Then, enter the IP address of the Linux Mint (remote machine) you want to access remotely in the Server field, along with the Username and Password in their specified fields. Lastly, click the Save and Connect button to establish the connection:

It’ll connect you to your remote Linux Mint system:

Congratulations! You’ve successfully accessed Linux Mint remotely from Ubuntu. Now, enjoy and explore Linux Mint from Ubuntu.
Conclusion
All in all, the Remmina app enables you to remotely access different operating systems. In this article, you’ve learned how to setup a remote desktop using Remmina on Ubuntu. First, you discovered how to install Remmina using two simple methods: the Command Line and GUI.
Next, we discussed how to configure Remmina to ensure your settings are correctly set up for connecting to remote systems. Finally, you explored how to access Windows and Linux remotely from Ubuntu.
I’m a technical writer with a Bachelor’s in Computer Science. Through my research and writing, I aim to provide readers with comprehensive, informative articles that can assist them make informed decisions about their technological needs.